Saturday, May 16, 2009

Client-side session termination

One of the most annoying things about session timeout, especially in a web site that uses AJAX, is that often the user is unaware of it. They come back to their computer after an extended time away, the page is right there as they left it, but when they start interacting with it, it exhibits strange behavior. "Why is the login page showing up where my report ought to be?" Or "Where did my data go? I just clicked the sort by name column and all of my data disappeared."

Of course, we developers know what happened. Our AJAX code got caught in the authentication/authorization trap because the session expired. The automatic methods we've set up to prevent unauthenticated users from accessing our site worked too well and the AJAX request got redirected as well.

Rather than build session awareness into all of my AJAX code, I've decided to take a different tack. I've created a jQuery plugin that works client-side to warn the user that their session is about to expire and, absent a confirmation to continue the session, redirects the user to the logout action of my MVC web site to formally end the session.

Requirements

I had a few requirements for my plugin. First, it needed to work with jQuery, obviously. In fact I had some existing non-jQuery code that I converted to a jQuery plugin. I did this partly as a learning experience in developing jQuery plugins and partly because I wanted to declutter the global javascript scope. It also reduces the complexity of my master page as I moved the code to its own javascript file (it's an intranet application so I'm not particularly concerned about adding to the number of requests being made).

Second, I wanted the plugin to use a dialog to inform the user of the imminent expiration of their session and allow them to continue it if they wanted or end it immediately. To this end, the plugin requires that the developer supply a URL that can be accessed to continue the session and another that will end the session: refreshUrl and logoutUrl. In my use I picked an existing lightweight page as the refresh url, though you could create a separate action. I use sliding windows so any request to the server will reset the server-side session timer so this worked for me. If your requirements are more complex a separate action may be preferable. For the logout, I used the same logout action that's connected to the logout button. Additional data can be added to the URLs by appending query parameters. The plugin only supports the GET method at this time.

Since I'm already using jQuery UI, my plugin relies on the jQuery UI Dialog widget. To this end the plugin requires that you have an element on the page that will function as the prompt dialog. The plugin is actually chained off this element. It will add OK and Logoutbuttons to the dialog.

Third, I wanted the session timeout and dialog wait times to be configurable so that I could supply actual timeout values from the real session via ViewData. I decided to provide sensible, for me, defaults based on the default ASP.NET session timeout of 18 minutes and 1.5 minutes, respectively. That is, the dialog will pop up after 18 minutes of "inactivity" and after an additional 1.5 minutes of "inactivity" the logout action will be invoked.

Since the default timeout for an ASP.NET session is 20 minutes, this means that the client-side will terminate the session 30 seconds before the server-side. This prevents the logout action itself from being redirected to the logon page. Strange things can happen if you're not careful about this. You don't want the redirection to end up with the logon page redirecting back to the logout action as can happen if your logout action requires authentication. This is a strictly a problem for my plugin, but I decided to avoid the potential complication by ending the session early. Developers need to be aware that whatever value you they supply for the timeouts will be adjusted so that the actual invocation of the timeout will occur 30 seconds prior to the supplied session timeout value.

Lastly, I wanted the plugin to restart its timers on any interaction with the server, rather than on client-side interaction. I decided that it was too much overhead and additional complexity to reset the timers on client-side interaction. To do so I would have to detect all events on the page and periodically "phone home" to ensure that the server side session was refreshed. I did, however, want to reset the timers on AJAX interactivity so the plugin inserts some default behavior into the ajaxStart chain that does this.

Implementation

I use the jQuery autocomplete plugin as my implementation template. I felt that it provided a clean and easy to understand implementation. Below is my current code with a sample implementation.

/*
* Autologout - jQuery plugin 0.1
*
* Copyright (c) 2009 Tim Van Fosson
*
* Dependencies: jQuery 1.3.2, jQuery UI 1.7.1, bgiframe (by default)
*
*/

;(function($) {

$.fn.extend({
autologout: function(refreshUrl, logoutUrl, options) {
options = $.extend( {}, $.Autologout.defaults, options );

this.each(function() {
new $.Autologout(this, refreshUrl, logoutUrl, options);
return false;
});
return;
}
});

$.Autologout = function( prompt, refreshUrl, logoutUrl, options ) {
var logoutTimer = null;
var sessionTimer = null;
var dialogWait = Math.max( 0, Number( options.sessionDialogWait * 60000 ) );
var timeout = Math.max( 30000, (Number(options.sessionTimeout) * 60000) - dialogWait) - 30000;

$(prompt).dialog( {
autoOpen: false,
bgiframe: options.bgiframe,
modal: true,
buttons: {
OK: function() {
$(this).dialog('close');
$.get( refreshUrl, resetTimers, 'html' );
},
Logout: sessionExpired
},
open: function() {
if (options.pageSelector) {
var height = $(options.pageSelector).outerHeight();
$('.ui-widget-overlay').animate( { 'height' : height }, 'fast' );
}
}
}).ajaxStart( function() { resetTimers(); } );

resetTimers();

function resetTimers()
{
if (logoutTimer) clearTimeout(logoutTimer);
if (sessionTimer) clearTimeout(sessionTimer);

sessionTimer = setTimeout( sessionExpiring, timeout );
}

function sessionExpiring()
{
logoutTimer = setTimeout( sessionExpired, dialogWait );
$(prompt).dialog('open');
}

function sessionExpired()
{
window.location.href = logoutUrl;
}
};

$.Autologout.defaults = {
sessionTimeout: 20,
sessionDialogWait: 1.5,
bgiframe: true,
pageSelector: null
};

})(jQuery);


Update: Note that I've added in the ability to specify a selector for your page content. In instances where the content is generated dynamically on the page, I've found that the dialog overlay can be too small for the generated content. If you specify a selector for an element that takes up the entire page, the overlay will be resized when the dialog is shown so that it covers all the content.

Sample implementation -- from my master page. Notice how I only include the code on the page if the request is authenticated. It shouldn't be run on any page that doesn't have an authenticated session, obviously.


<% if (this.Request.IsAuthenticated)
{
double sessionDialogWait = 1.5;
double sessionTimeout = 30;
if (ViewData["sessionTimeout"] != null)
{
sessionTimeout = Convert.ToDouble( ViewData["sessionTimeout"] );
}
%>
<%= Html.Javascript( Url.Content( "~/Scripts/autologout.js" ) ) %>

<script type="text/javascript">
$(document).ready( function() {
$('#sessionEndDialog').autologout( '<%= Url.Action( "About", "Home" ) %>', '<%= Url.Action( "Logout", "Account" ) %>', {
sessionTimeout : Number('<%= sessionTimeout %>'),
sessionDialogWait: Number('<%= sessionDialogWait %>')
});
});
</script>

<% } %>


...snip...


<div id="sessionEndDialog" title="Session Expiring" style="display: none;">
<p>
Your session is about to expire. Click OK to renew your session or Logout to logout
of the application.
</p>
</div>
Sunday, May 10, 2009

Tales of UI Mock ups

I'm not, or perhaps I should say, I wasn't a big fan of using tools for UI mock ups.

Most of the time I prefer to do my mockups on a whiteboard. Mocking up a UI on a whiteboard has several advantages. First, the client knows that it's not the real UI. It's amazing, to me anyway, how important that really is. The minute you have something that looks real, you start focusing the details of the interface. Early on, when the mock up is most useful, you don't want to spend much time worrying about the particular details -- how many pixels away from this input element the text is or the exact color of that background.

I find that it's helpful to draw a picture of how the interface might work when trying to explain my ideas of how it could work. My feeling is that making the UI mockup too real at this point runs the risk of changing the focus from the function of the application to the look of the application. Now, there are aspects of the interface that both strongly affect functionality and are driven by it. For example, drop down lists are excellent ways to present a small number of fixed choices to a user, but fixating on a drop down list can drive the design of the interface in ways that may not be appropriate if the number of potential inputs is very large. Knowing what you need to accomplish at this point is much more important that deciding how you are going to accomplish it. Conversely, once you know the parameters of what you are trying to accomplish, some of the UI interface components are constrained.

Second, I know that it's not the real interface. You may not have this problem, but I tend to be a perfectionist. For me, using a tool holds the temptation for me to start fixating on the details of the interface. I start worrying about the color scheme -- trying various combinations and shadings to get just the right look -- or spending time getting this particular element to line up with that one or center under another. Now there is a time to focus on that, assuming that it's important to the customer, but mock up time is probably not the time for this. I'd really prefer to get a version or two in front of the customer to use before I start spending a lot of time trying to perfect the look and feel.

Because I follow an agile philosophy, I expect that feedback on the early versions will drive the functionality and the interface in ways that we may not have expected when conceiving the initial application requirements. The further we get into development, the more stable the interface will, or should, become. Once the interface has stabilized it makes more sense to spend effort on getting the look and feel perfected. That's not to say that significant effort doesn't go into developing the interface, but I prefer that it be done as I'm developing the actual interface not the mock up. I prefer to use the mock up as a design guideline, not a finished product that needs to simply be translated into the application.

In addition, I really like the extremely low cost of using a whiteboard. I don't have to worry about access to the computer on my desk with the application. I don't have to spend a lot of time in advance preparing different versions, anticipating the possible the directions the feature discussion will take.

Unfortunately, there's one or two very big disadvantages to the whiteboard: it's hard to keep the artifacts you develop there in a format that is both permanent and modifiable. This is especially true if the whiteboard is not in your office. I often take pictures of the whiteboard and store them in my development wiki along with my stories, but I can only refer back to these. If I want to make changes, I need to redraw the mock up each time, take a picture, and store it. It's also very difficult to share a whiteboard, at least, a plain, ol' whiteboard, such as the ones we have in our office, with people who aren't in the same building.

I recently ran into a problem along this line with the jQuery slideshow I wrote about earlier. I wasn't happy with the location of my slideshow controls: centered over the top of the image. Whenever the image orientation or size change in the slideshow, the controls would move on the page. It was disconcerting to say the least. Rather than change the actual interface, I decided to mock up some alternatives to see how it would work visually before committing to changing code.

I could have done this on a whiteboard and, in the past, I probably would have. I decided to try out a new tool, however, that I had found out about on StackOverflow. That tool is Balsamiq Mockups from Balsamlq Studios. Balsamiq Mockups basically allows you to sketch out a user interface in a way that mimics a hand-drawn interface. You can save the interface, open it up again later, and modify it if you want. Balsamiq has versions of their tool for Confluence, Jira, and xWiki, as well as a desktop version.

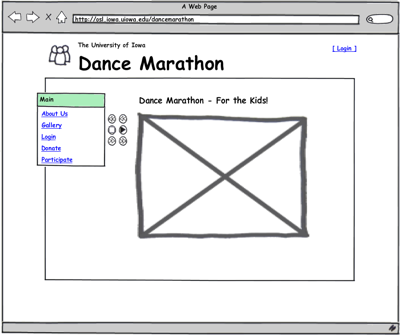
I decided to download a copy of their desktop version and draw up my interface. Unfortunately, the trial version didn't include the ability to save and I didn't make a screenshot, but I was really pleased with how quickly I was able to mock up a look alike to the existing interface and make my control changes. Once I did I was able to see that the controls, now anchored in a 2x3 block on the upper left of the images, worked well visually. I went ahead with the changes and, more to the point, decided to convince my manager to try the version for Confluence, which I also use as a permanent extension of my development practices. I have a lot of hopes for Balsamiq Mockups. It seems to encompass the best features of hand-drawn mock ups - we can focus on the elements, not the details and there's not a lot of investment/cost to developing them -- and allows me to save and share them for later use.

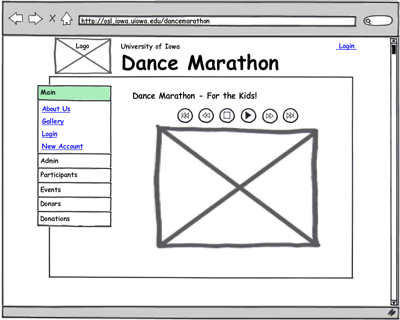
Below are a couple of mock ups developed with the trial version of the tool for Confluence. Neither of these took more than a few minutes to work up. They are embedded in the wiki with my development stories and available to the customer from the web. Notice how in the second mock up, I've replaced the image placeholder in the header with one of the standard icons. You can check out the actual interface at http://osl.iowa.uiowa.edu/dancemarathon for comparison.

Original Gallery


Updated Gallery Showing New Menu Item


We're still early in develop on this application so we haven't invested a lot in the public interface. The application is still mostly oriented toward the administrative functions required for managing the Dance Marathon event. I fully expect to get much more use out of the tool as we work on the Donor and other public parts of the application.

Tuesday, May 5, 2009

Auditing inserts and updates using LINQ to SQL

Any time you have an application where multiple people fill different roles in the application, you probably have a need to audit at least some of the changes that those people can make in your database. Sometimes this might be for security purposes; other times you may want to be able to quickly restore the state of a particular row or rows in the database. I often do auditing for these purposes. Recently I discovered another use, which undoubtedly others discovered before me, but it's sometimes helpful to provide notifications based on changes in the database. An audit log can provide the history for these types of triggers.

The application I'm currently working on, a tracking application for the Dance Marathon [not my site] student group at the Unversity of Iowa, has some of these auditing needs. Since I'm using LINQ to SQL as my ORM, I chose to implement my auditing code-side in submit changes. To this end, I created an AuditableDataContextBase class that derives from DataContext and will be the base class for my LINQ to SQL data context. The context has an CurrentUser property that holds the identity of the current user. This property is set in the factory method that creates my data context. AuditUser is actually pretty simple:

public class AuditUser
{
public int ID { get; set; }
public string Name { get; set; }

public AuditUser()
{
ID = 0;
Name = "system";
}

public AuditUser( Participant participant )
{
if (participant == null)
{
throw new ArgumentNullException( "participant" );
}
this.ID = participant.ParticipantID;
this.Name = participant.DisplayName;
}
}

The Participant class is my user entity class for the application.


The factory method that creates the data context is also pretty simple, although, it actually returns a wrapper around the data context. I described a little bit about the wrapper in my previous post. Because the "current user" depends on the context of the request and must make a call into the database to get a user entity to use in constructing the AuditUser object, intject a copy of the wrapper into the a utility method use to extract the user's identity from the web context and retrieve the appropriate entity from the database. Here's the interface and base class that does most of the work.

public interface ICurrentUserUtility
{
AuditUser GetAuditUser();
AuditUser GetAuditUser( IAuditableDataContextWrapper dataContext );
}

public abstract class CurrentUserUtilityBase : ICurrentUserUtility
{
private HttpContextBase WebContext;

protected CurrentUserUtilityBase( HttpContextBase httpContext )
{
this.WebContext = httpContext ?? (HttpContext.Current != null ? new HttpContextWrapper( HttpContext.Current ) : null);
}

public abstract AuditUser GetAuditUser();

public AuditUser GetAuditUser( IAuditableDataContextWrapper dataContext )
{
if (this.WebContext != null
&& this.WebContext.User != null
&& this.WebContext.User.Identity != null
&& this.WebContext.User.Identity != WindowsIdentity.GetAnonymous())
{
var participant = dataContext.Table<Participant>()
.Where( p => p.UserName == this.WebContext.User.Identity.Name )
.Select( p => new AuditUser { ID = p.ParticipantID, Name = p.DisplayName } )
.SingleOrDefault();
if (participant != null)
{
return participant;
}
}
return new AuditUser();
}
}

Each implementing class is associated with a particular data context type and thus I can have different utility classes for each data context. Note that because I'm implementing an interface I need not take advantage of the base class implementation and could have a utility that derived the user's identity from something other than the web context. This will be important later on when I have Windows services that perform updates on an automated basis so that I can inject a well-known id for auditing purposes. Here's the implementation for the data context that holds my user data.

public class CurrentUserUtility : CurrentUserUtilityBase
{

public CurrentUserUtility()
: this( null )
{
}

public CurrentUserUtility( HttpContextBase httpContext )
: base( httpContext )
{
}

public override AuditUser GetAuditUser()
{
IDataContextFactory factory = new MasterEventDataContextFactory();
using (IAuditableDataContextWrapper wrapper = factory.GetDataContextWrapper())
{
return GetAuditUser( wrapper );
}
}
}

The wrapper class encapsulates the actual data context and simply delegates actions to it (the wrapper exists to make the data context testable, so it's not very complicated). The interesting bit is in the base data context. The SubmitChanges method constructs an AuditUtility that does the actual auditing and uses the ChangeSet to know what it needs to audit. I want to audit both failure and success, so I catch any exceptions throw by the base SubmitChanges method and the presence or absence of the exception to determine whether the operation was successful. Once the changes have been made, methods on the AudityUtility are used to log the various types of changes from the ChangeSet.

public override void SubmitChanges( System.Data.Linq.ConflictMode failureMode )
{
using (AuditUtility auditor = new AuditUtility( this.CurrentUser ))
{
ChangeSet changes = this.GetChangeSet();

bool success = false;
Exception caughtException = null;
try
{
base.SubmitChanges( failureMode );
success = true;
}
catch (Exception e)
{
caughtException = e;
}

foreach (object deleted in changes.Deletes)
{
auditor.AuditEntity( deleted, ChangeAction.Delete, success );
}
foreach (object inserted in changes.Inserts)
{
auditor.AuditEntity( inserted, ChangeAction.Insert, success );
}
foreach (object updated in changes.Updates)
{
auditor.AuditEntity( updated, ChangeAction.Update, success );
}

if (caughtException != null)
{
throw caughtException;
}
}
}


The AuditUtility


Finally, we come to the class that actually creates the audit records, the AuditUtility. The AuditUtility works by using an AuditContextAttribute that decorates classes that need to be audited. It assumes that for each class so decorated, there is an [Audit.] table in the data context containing the audit entities. This audit class has the schema of the decorated class with the exception that the "id" parameter of the decorated class is not an auto-generated column and it has additional AuditID (primary key, identity column), ModifiedByID (int), ModifiedByName (varchar), ModifiedAt (datetime), Modification (varchar), and Success (bit) columns.

The AuditContextAttribute specifies both that the class is able to be audited and specifies the type of the audit entity to use. It gets applied to a partial class implementation for the entities that need to be audited.

[AuditContext( AuditType = typeof( Audit_Event ) )]
public partial class Event
{
...
}

internal class AuditContextAttribute : Attribute
{
public Type AuditType { get; set; }

private string tableProperty;
public string TableProperty
{
get
{
if (string.IsNullOrEmpty( this.tableProperty ))
{
this.tableProperty = this.AuditType.Name;
}
return this.tableProperty;
}
set { this.tableProperty = value; }
}
}

The AuditUtility class has a couple of utility methods. GetAuditContext is used to extract the AuditContextAttribute from an entity, if it exists. CopyColumns is used to copy the common columns, as indicated by the ColumnAttribute on the decorated entity class, from the decorated entity to the audit entity. The latter uses reflection over the public properties of the two classes. Note that we skip any timestamp columns. The timestamp column on the audit entity reflects its version, not the version of the decorated entity.

private AuditContextAttribute GetAuditContext( object entity )
{
return entity.GetType().GetCustomAttributes( typeof( AuditContextAttribute ), false )
.Cast<AuditContextAttribute>()
.SingleOrDefault();
}

private void CopyColumns( object from, object to )
{
if (from == null)
{
throw new ArgumentNullException( "from" );
}
if (to == null)
{
throw new ArgumentNullException( "to" );
}

var fromType = from.GetType();
var toType = to.GetType();

foreach (var fromProperty in fromType.GetProperties())
{
var attribute = fromProperty.GetCustomAttributes( typeof( ColumnAttribute ), false )
.Cast<ColumnAttribute>()
.FirstOrDefault();
if (attribute != null && !attribute.IsVersion)
{
var toProperty = toType.GetProperty( fromProperty.Name );
toProperty.SetValue( to, fromProperty.GetValue( from, null ), null );
}
}
}

The AuditUtility class has two constructors. The first is used by the actual code, the second by my unit tests. The second allows me to inject a fake data context which is useful for testing. Notice that the AuditUtility implements IDisposable, however, when the data context is passed in, we don't need or want to dispose of the injected context. My IDisposable implementation checks the NeedDispose property before it attempts to dispose of the AuditDataContext (the context containing the audit entities). When used normally, this context will be created by the utility and disposed when the Dispose method is called. Also notice that we always inject the current user, an AuditUser object. This object is used to set the ModifiedByID and ModifiedByName columns in the audit entity.

public AuditUtility( AuditUser currentUser )
: this( null, currentUser )
{
}

public AuditUtility( IDataContextWrapper auditDataContext, AuditUser currentUser )
{
this.CurrentUser = currentUser ?? new AuditUser();
if (auditDataContext == null)
{
this.AuditDataContext = new DataContextWrapper<MasterEventAuditingDataContext>();
this.NeedDispose = true;
}
else
{
this.AuditDataContext = auditDataContext;
}
}

Lastly, we have the method that pulls everything together, AuditEntity. This method takes the entity to audit, the action that was attempted, and the status of the action. It creates an appropriate audit entity for the entity being audited and populates its values based on the entity parameter. Each audit entity is required to implement IAuditEntity. Basically, IAuditEntity defines a method that is used to set the auditing properties on the entity. It would be nice to be able to provide this in a base class, unfortunately the properties that you need to modify belong to each LINQ-to-SQL designer generated class so they can't be put in a base class. The easiest thing to do is to violate DRY and repeat the code in each audit entity.

#region IAuditEntity Members

public void SetAuditProperties( int participantID, string participantName, ChangeAction action, bool success )
{
this.ModifiedAt = DateTime.Now;
this.ModifiedByID = participantID;
this.ModifiedByName = participantName;
this.Modification = Enum.Format( typeof( ChangeAction ), action, "g" );
this.Success = success;
}

#endregion

The method defined by IAuditEntity is used in conjuntion with the private helper methods to make the audit entity and store it using the AuditDataContext.

public void AuditEntity( object entity, ChangeAction action, bool success )
{

if (entity == null)
{
throw new ArgumentNullException( "entity" );
}

if (action != ChangeAction.None) // only audit inserts, deletes, and updates
{
AuditContextAttribute auditContext = GetAuditContext( entity );
if (auditContext != null)
{
var auditTable = this.AuditDataContext.Table( auditContext.AuditType );
if (auditTable != null)
{
try
{
IAuditEntity auditEntity = Activator.CreateInstance( auditContext.AuditType ) as IAuditEntity;
if (auditEntity != null)
{
CopyColumns( entity, auditEntity );
auditEntity.SetAuditProperties( this.CurrentUser.ID, this.CurrentUser.Name, action, success );
auditTable.InsertOnSubmit( auditEntity );
this.AuditDataContext.SubmitChanges();
}
}
catch { }
}
}
}
}
Alternative IAuditEntity (Updated)


As an alternative you might want to define the audit properties (ModifiedAt, ...) on the IAuditEntity interface and define the SetAuditProperties() method as an extension on IAuditEntity. This way you can define the method just once -- as long as you want it to work the same way for all audited entities. All of your additional audit properties will need to be the same for all audit entities. In practice I have found this to be the case, however, and I now define set up my auditing this way.
public interface IAuditEntity
{
int ModifiedByID { get; set; }
string ModifiedByName { get; set; }
string Modification { get; set; }
bool Success { get; set; }
}


public static class AuditEntityExtensions
{
public static void SetAuditProperties( this IAuditEntity source, int modifiedByID, string modifiedByName, ChangeAction action, bool success )
{
source.ModifiedByID = modifiedByID;
source.ModifiedByName = modifiedByName;
source.Modification = Enum.Format( typeof( ChangeAction ), action, "g" );
source.Success = success;
}
}

Some Final Notes


In order to make sure that the audit records stay intact, as a final measure, I add triggers to each of the audit tables that run on UPDATE and DELETE. These triggers simply rollback the transaction. This prevents my application and any users from removing or changing the audit records accidentally. For my integration tests, I do disable the triggers so that the test data can be removed from my test database instance.


I'd be interested in hearing your solutions to the same or similar problems. Eventually, I may need to add select/read auditing to the application as well. Unfortunately, I haven't been able to think a way to do this except by implementing the OnLoad partial method in each of my entity classes. To do insert/update/delete auditing the only change to my entities is to decorate them with the AuditContextAttribute. Doing select/read auditing will require more intrusive methods I'm afraid.